GP Car Audio Deadener
-
GP Sound Deadener Roller
Vendor:GP Car AudioRegular price $14.99 USDRegular price -
GP STFU v2 250 MIL SOUND DEADENER
Vendor:GP Car AudioRegular price From $34.99 USDRegular price



-
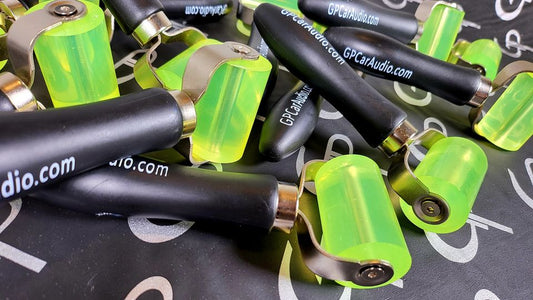
 GP Sound Deadener RollerThe GP Sound Deadener Roller makes installing sound deadener quick, easy, and effortless. Its agronomical handle gri...$14.99
 -
 GP STFU v2 250 MIL SOUND DEADENERProduct Description -Pure Butyl -Foil Barrier -CCF Layer Get the job done in a SINGLE layer with the GP STFU 250 Mil ...$34.99


GP Car Audio Sound Deadener & STFU V2 Deadening Material
Sold by AudioSellerz.com
Shop GP Car Audio sound deadener at AudioSellerz.com, including GP STFU V2 sound deadening material and installation tools for treating doors, trunks, floors, roofs, hatches and other areas of a vehicle that can vibrate or rattle from a powerful car audio system.
Sound deadening is one of the easiest parts of a build to overlook, but controlling unwanted panel vibration can make a noticeable difference in how solid and finished a car audio installation feels.
Shop all GP Car Audio products | Shop car audio speakers | Shop car audio subwoofers
GP STFU V2 Sound Deadener
The GP STFU V2 sound deadener in this collection is made for customers who want to reduce unwanted vibration and resonance in vehicle panels.
High-output subwoofers and amplified door speakers can cause thin metal and interior panels to flex, buzz and rattle. Applying sound deadening material to problem areas helps control that movement and can create a more solid foundation for the audio system.
Car Audio Sound Deadening
Car audio sound deadening is commonly installed when upgrading speakers, adding subwoofers or building a louder system.
Areas that are commonly treated include:
- Front and rear doors
- Trunk lids
- Hatches
- Quarter panels
- Floors
- Roof panels
- Rear decks
- Speaker mounting areas
The best locations depend on where the vehicle is flexing or making unwanted noise.
Why Use Sound Deadener in a Car Audio System?
Vehicle sheet metal and interior panels can resonate when speakers and subwoofers create pressure inside the cabin.
Sound deadening material can help:
- Reduce panel vibration
- Control rattles and buzzing
- Create a more solid speaker mounting environment
- Improve the feel of door-mounted midbass
- Reduce unwanted trunk and hatch noise
- Help keep the system sounding cleaner at higher volume
Sound deadener does not replace proper speaker mounting, enclosure design or system tuning. It works alongside those parts of the installation.
Sound Deadening for Car Doors
Doors are one of the most common places to install car sound deadening material.
Door-mounted speakers can cause the outer door skin, inner door structure and trim panels to vibrate. Treating those areas can help create a more stable environment around the speaker.
This can be especially useful with upgraded midrange and midbass speakers that are producing significantly more output than the factory speakers.
Browse our car audio speakers if you are treating your doors as part of a speaker upgrade.
Sound Deadener for Subwoofer Systems
Subwoofer systems can create enough pressure to make trunk lids, hatches, rear decks and interior panels vibrate heavily.
Adding sound deadener for car audio to these areas can help reduce unwanted rattles so more of what you hear comes from the subwoofer system rather than loose panels.
The louder the bass system becomes, the more important it becomes to identify and control weak or flexible areas in the vehicle.
If you are still building the bass side of the system, browse our car audio subwoofers and subwoofer boxes and enclosures.
250 Mil Sound Deadening Material
The GP STFU V2 product currently in this collection is a 250 mil sound deadener.
Thicker deadening material can be useful in areas where additional mass and vibration control are desired, but installation quality still matters. The material needs to be applied securely to a clean surface and pressed firmly against the panel.
Always check the individual product listing for package quantity, coverage and exact product specifications before ordering.
GP Sound Deadener Roller
This collection also includes the GP sound deadener roller, an installation tool used to press deadening material firmly onto vehicle panels.
A roller helps work the material into the surface and around contours while improving contact with the panel.
Using a roller can be especially helpful in:
- Door skins
- Trunk floors
- Wheel wells
- Roof panels
- Rear quarter panels
- Other uneven vehicle surfaces
How to Install Car Sound Deadener
For most applications, start by removing the necessary interior panels and cleaning the metal surface so it is free of dirt, dust, grease and loose material.
Measure and cut the deadener to fit the area, apply it to the panel and use a sound deadener roller to firmly press the material into place.
Pay extra attention to areas that already flex, buzz or rattle when the system is playing.
Avoid covering wiring connectors, drain holes, service openings, moving window mechanisms or other areas that need to remain accessible.
Do You Need to Sound Deadening the Entire Car?
Not necessarily.
Some builds benefit from treating large portions of the vehicle, while others only need targeted treatment around the doors, trunk or specific panels that are creating problems.
For a simple speaker upgrade, treating the door area around the speaker may be enough. For a large subwoofer build, considerably more of the trunk, hatch or cabin may need attention.
Car Sound Proofing vs Sound Deadening
People often search for car sound proofing when what they actually need for a car audio build is vibration treatment.
Sound deadener primarily helps control panel resonance and vibration. Fully soundproofing a vehicle from outside road noise usually requires a more complete combination of materials and treatments.
For car audio systems, reducing vibration and rattles is usually the main goal.
Shop GP Car Audio Deadener at Audio Sellerz
Shop GP Car Audio deadener, GP STFU V2 sound deadening material and installation tools at AudioSellerz.com for doors, trunks, hatches and high-output car audio systems.
If you are not sure how much deadener you need or where you should apply it, use the live chat bubble on AudioSellerz.com and tell us what vehicle and audio system you are working with.
Follow Audio Sellerz
Follow Audio Sellerz for car audio builds, sound deadening installs, product testing, system demos and new equipment:
Follow Audio Sellerz on Facebook
Follow Audio Sellerz on Instagram
Follow Audio Sellerz on TikTok
Subscribe to Audio Sellerz on YouTube